Shipping
Spend over £100 (ex. VAT) to qualify for free Next Day Delivery (applicable to UK mainland, exceptions may apply).
Order cut-off time for Next Day Delivery is 2:30pm where items are in stock.
Your basket is currently empty
Spend over £100 (ex. VAT) to qualify for free Next Day Delivery (applicable to UK mainland, exceptions may apply).
Order cut-off time for Next Day Delivery is 2:30pm where items are in stock.
Complete your order via the checkout and select 'Pay By Pro-Forma Invoice'. One of our team will be in touch to provide a Pro-Forma Invoice with the appropriate international shipping costs.
Request a Quotation or Pro-Forma If you would like a quotation or would prefer to pay by pro-forma invoice. Simply add your items to the cart and select 'Request a Quotation' or 'Request a Pro-Forma' at checkout. One of our team will be in touch.


| Units | % | Price per unit |
|---|---|---|
| 4 | 10% | £28.79 |
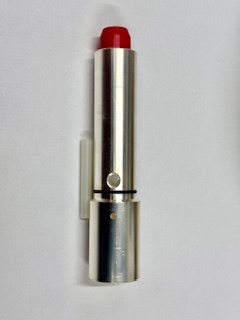
Powersafe P3 Replacement Contact for Powersafe Powerlock Connector 800A Line Drain
C240 Line Drain Crimp 240mm2 SCP0250
It is important to use the recommended Crimp tool and Die to ensure a satisfactory crimp: ME series Crimp Die Hand Held Crimping Tool: CEMBRE HT 131-C Cordless Hydraulic14.4v Crimping Tool : B 131-C 1.
A hydraulic crimping tool and hexagonal Die set is used to perform a crimp termination.
Selection of the correct crimp die is essential to achieve a reliable result. As cable conductor sections vary widely, the table in the enclosed PDF download is intended as a guide to appropriate die selection. Cable tensile test should be performed to ensure the final crimp termination meets the tensile and mv drop test of a particular specification.
Crimp Termination Guide
1: Select the appropriate Die set: For example if you are using a 240mm ² cable use Die set ME48.
2: Strip the cable jacket to leave 43mm of conductor exposed.
3: Slide the conductor into the rear of the contact.Take care to ensure all the wire strands are inside the contact.
4: Place the contact and cable carefully into the die set and close the crimping tool. In
the case of tool HT131 the tool hands are pumped until they go no further.
As the tool reaches the required compression you will feel and hear a click. The tool can
then be opened to release the finished crimp.
5: In some case more than one crimp is recommended to ensure the maximum surface
are of crimp are achieved. From table 2 we can see for example that a 240mm crimp
should be made in 3 equidistant positions along the contact crimp area.